Websites require continuous maintenance and updates to function optimally. Sometimes, changing things or even not changing them properly can result in errors on a website.
In this post, you'll learn what a 403 forbidden error is and how to fix it quickly.
What Does a 403 Forbidden Error Mean?
Requests that you make to a server can return a variety of status codes. One such status code is the 403. The 403 forbidden error basically means that the server understands your request but is denying access to a certain resource on your website to users.
It is up to servers to provide more information about the reason for forbidding the request.
What Can Cause a 403 Forbidden Error?
There are many things that can cause a 403 error. However, the three most common reasons that can result in a 403 error are:
- a corrupted .htaccess file
- incorrect file permissions
- installed plugins
You should consider reading our post about understanding and configuring the .htaccess file in WordPress if you aren't already familiar with it. In short, the .htaccess file is used by Apache web servers to determine how they should serve files to visitors. Any errors in the file can therefore stop the website from functioning.
Incorrect file permissions are another reason that can cause a 403 error. Files and directories on computer systems have certain permissions assigned to them. This prevents people from reading, writing, or executing a file they don't have access to. It is important to keep sensitive files protected, but files and directories that are part of WordPress need permissions assigned to them in such a way that they meet the minimum basic requirements.
Fixing a 403 Forbidden Error
In this section, we will learn how to fix the 403 forbidden error either by restoring our .htaccess file or by setting up proper file permissions.
Fixing a Corrupt .htaccess File
The .htaccess file in your WordPress installation can be modified in three different ways. Sometimes, it is modified by the WordPress core, and other times some plugins make changes to this file. It is also possible that you might have manually made some changes to this file.
In any case, the most beginner-friendly way to get rid of a 403 error due to an .htaccess file is to remove the old version and force WordPress to create a new one.
Make sure that you take a fresh backup of the old .htaccess file before you remove it. Save it locally on your computer or somewhere else. If generating a new .htaccess file doesn't resolve the error, you could just re-upload the fresh backup and move on to the next step.
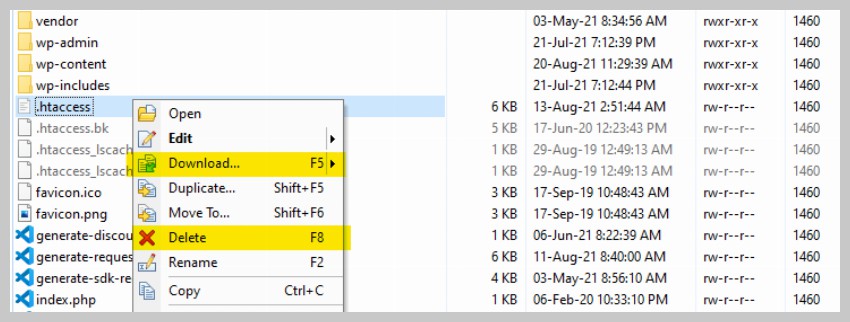
You should see an .htaccess file once you have logged in to the root directory of your website on your FTP client. Right-click on it to first download a local copy and then delete the file.


Try visiting your website now. If it opens properly, this means that some rule inside the .htaccess file was causing the error. In this case, you can generate a new .htaccess file by simply going to the WordPress Admin dashboard and then navigating to Settings > Permalinks and clicking on Save Changes.


Setting the Correct File Permissions
Specifying the right value for file permissions allows you to keep your website secure while still being able to provide access to users who need it to keep everything running smoothly. The general rule to keep in mind is to start with restrictive permissions and then relax them until things start working. Luckily, we don't need to do all these tests to figure out the right permissions for our WordPress website.
Within your WordPress installation, you can set the permissions for all directories to 755 and the permissions for all files to 644. This should take care of any 403 errors arising out of incorrect file permissions. The meaning of permission numbers like 755 is explained in more detail in the official WordPress documentation.
There are free FTP clients like FileZilla or WinSCP that you can use to set these permissions for different files and directories recursively.
You can check the current permissions of a file or directory by right-clicking on its name and then selecting File Permissions from the context menu.


This should open up a dialog box, which will show you the currently applied permissions and ask if you want to apply them recursively to different files and sub-directories.


Disable All Plugins
Creating a new .htaccess file or properly setting up file permissions fixes the 403 forbidden error issue for the majority of users. One more thing that you can try in the unlikely scenario that you are still getting the error is to disable all plugins. A poorly coded plugin or incompatibility between different plugins, among other things, can also result in 403 errors.


Once all the plugins have been disabled, check if the website still returns a 403 error. If the website is loading now, this means that one of the plugins is causing the 403 forbidden error. Now start activating the plugins one by one to see when the error happens again. This will tell you which plugin is causing problems, and you can contact its developers to fix the issue or install an alternative plugin in its place.
Final Thoughts
In this post, we have covered the three most common issues that can result in a 403 forbidden error in WordPress. Hopefully, one of these will fix the issue for you. You should consider contacting your web host if you are still getting the error. They might suggest some other things that you could do. Just make sure that you make backups of anything that you change in case you want to revert to a previous version.


No comments:
Post a Comment